
Appearance
Steps and ordering
A workflow's steps are an ordered list of definition invocations. Steps execute in declared order. Each step's writes are visible to subsequent steps — the sequential feed-through that makes composite cascades work.
This page covers configuration and the patterns that ride on top of ordering.
What a step is
Each step in a workflow:
- References one definition by name. The definition lives inside its target entity; the step just names it.
- Has an enable/disable toggle. Disabled steps stay in the list but skip at runtime.
- Has a position in the workflow's step list. That position determines execution order.
Steps don't have their own Context, Mapped columns, or behavior — those live on the definition. The step is just "invoke this definition at this point in the chain."
The sequential feed-through
Steps execute in the order they appear in the workflow. Each step's writes are visible to subsequent steps.
A concrete example: a workflow has 5 steps:
| # | Step | Definition Context → Mapped |
|---|---|---|
| 1 | Vendor Select | (vendorName) → vendorAccount, currency, VendorId |
| 2 | Initialize Products | (customerInitials, vendorAccount) → itemDescription (Dropdown) |
| 3 | Add Accountant and Warehouse | (customerInitials, vendorAccount) → accountant, warehouse |
| 4 | Item Product Dropdown Init | (customerInitials, vendorAccount) → Item_erpItemDescription |
| 5 | Item Product Mapping | (customerInitials, vendorAccount, ProductCode) → Item_erpItemCode |
Step 1 writes vendorAccount. Step 2 uses vendorAccount as part of its Context — and it reads the newly-written value from step 1, not the previous value.
This is the sequential feed-through. Steps build on each other. The customer composes workflows around this fact: place "establish the discriminator" steps first, then "look up under the discriminator" steps later.
Adding steps
The workflow editor puts every definition in the project on the right and the workflow's own steps on the left. You compose the chain by dragging between the two columns.
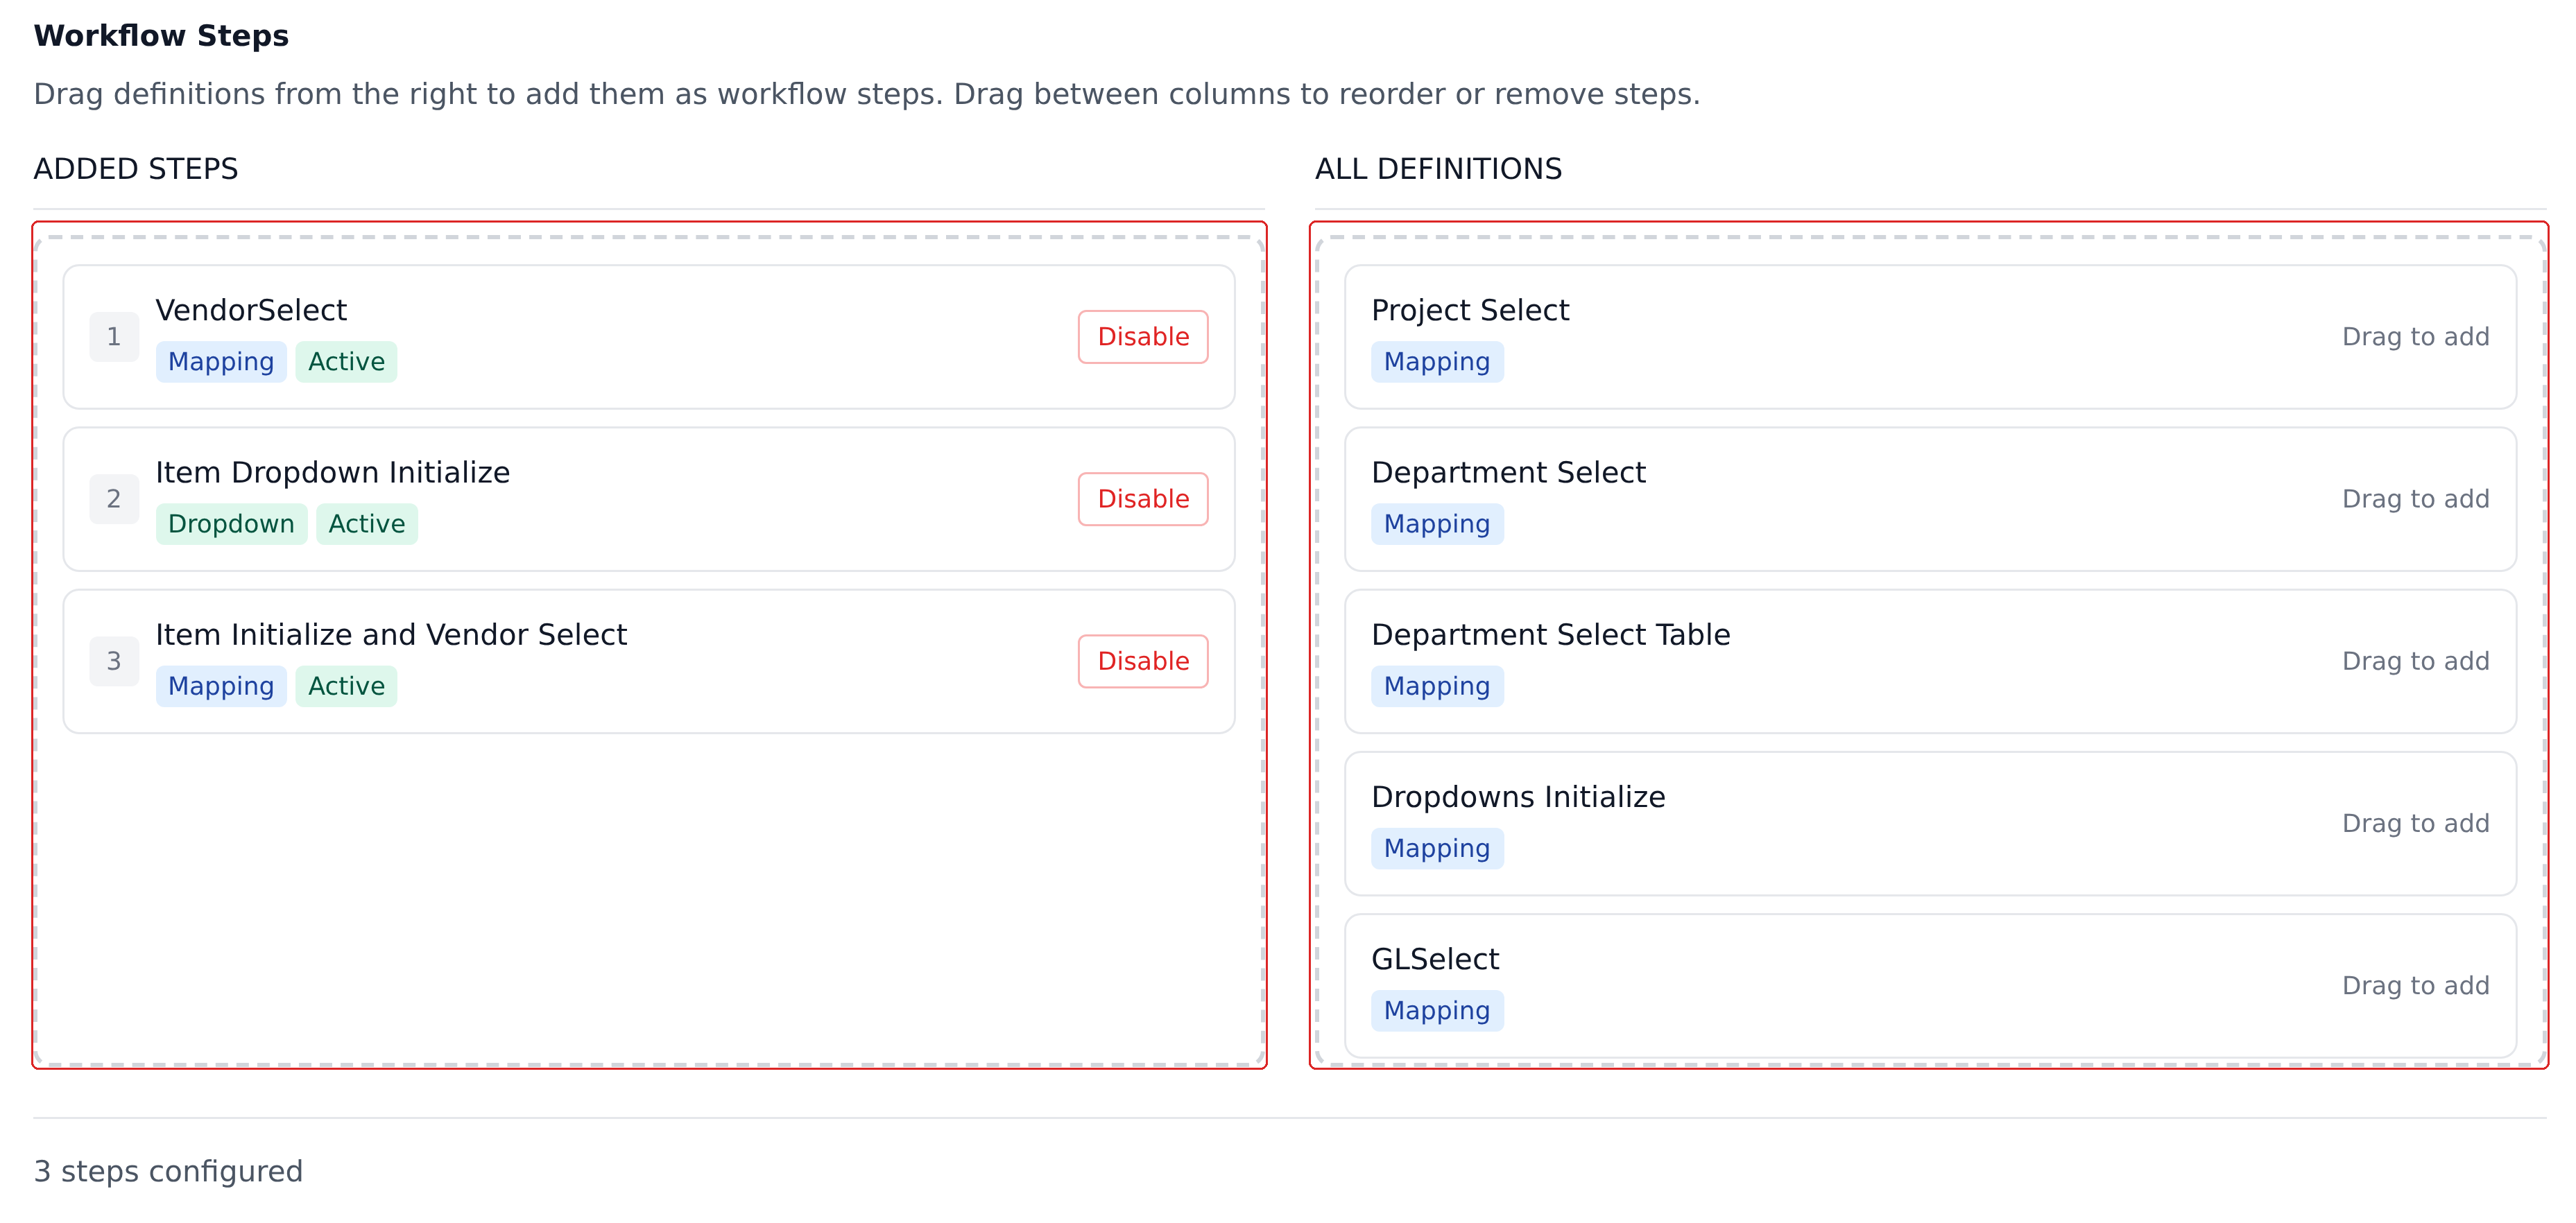
- Drag from All Definitions to Added Steps to add a step.
- Drag within Added Steps to reorder — the numbers renumber as you go.
- Drag back out to remove a step.
- Disable turns a step off without removing it.
There's no "create new definition" affordance here — build definitions inside their entity first, then reference them from a workflow.
Disabling a step
Each step has an enable/disable toggle. Disabled steps stay in the workflow's step list but skip at runtime. Useful for:
- Staging. Author the step now; enable it later when the corresponding entity is ready.
- Debugging. Turn off a suspect step to isolate which one is causing odd behavior.
- Phased rollout. Enable steps one at a time as they're tested in production.
The disable state persists. Reloading the project or restarting your browser doesn't re-enable.
Reordering by drag — and the order-matters trap
Reorder steps by dragging them within the Added Steps column. The new order takes effect on the next workflow run.
Reordering matters because of the sequential feed-through. Moving step 3 to step 1 means step 3's writes are now visible to what used to be steps 1 and 2.
The trap: reordering without thinking about Context dependencies produces silent breakage.
Example: if a workflow's step 1 establishes customerInitials and step 4 uses customerInitials in its Context, moving step 1 to position 5 means step 4 runs with customerInitials=(empty). The lookup misses, the step is a silent no-op, and the document looks broken.
Sketch dependencies before reordering
For workflows with more than 4–5 steps, draw the dependency graph before reordering. Identify which steps write to fields other steps read. Make sure writes happen before reads in the new ordering.
For shorter workflows, mental modeling is usually enough — but be deliberate.
Dropping a step in the middle
When you drop a step partway through a workflow, it sees the writes of all preceding enabled steps. It writes to whatever the cascade has built up so far.
This is the typical pattern for evolving a workflow:
- Start with a few steps establishing basic context.
- Add a step that uses the established context for a more specific lookup.
- Add another step that depends on the new one.
Each new step plugs into the cascade that the earlier steps produced.
Steps without context-narrowing
A definition with zero Context columns matches every row in the entity. A step invoking such a definition runs against the entire entity — typically used for dropdown population (rebuilding a dropdown from every row of an entity, regardless of context).
This is fine for dropdown init. It's a mistake for Mapped writes (the top row of the entire entity would write to the document field, which rarely makes sense for entities with many rows).
The UI doesn't prevent zero-Context Mapping Definitions; you have to think about it. If you see a "writes the wrong value" bug, check whether the offending definition has Context columns.
Multiple steps writing to the same field
If two steps in the same workflow write to the same document field, the later step wins (last-write-wins).
This is occasionally useful — a step writes a default value, a later step overrides it conditionally. More often it's a bug from not thinking through composition. If two definitions independently target the same field, that's usually a sign one of them shouldn't.
Step count limits
There's no hard documented limit on the number of steps in a workflow. Practical limits come from:
- Settle time — more steps means longer cascade. Workflows typically settle in ~1–2 seconds, though complexity can push that toward the higher end.
- Maintainability — workflows beyond ~15 steps become hard to reason about.
If you're approaching that complexity, consider:
- Splitting the workflow — but remember the no-cross-workflow rule. Splitting means losing cascade between the parts.
- Consolidating definitions — fewer steps doing more work each.
- Rethinking the entity shape — sometimes a different entity layout removes the need for so many steps.
Worked example — Initial Workflow steps
A typical Initial Workflow in a discriminator-pattern project has roughly this shape:
| # | Step | Establishes |
|---|---|---|
| 1 | Initialize Customer Initials | The discriminator |
| 2 | Setup Dropdowns | Static dropdown options |
| 3 | Initialize Vendors | Vendor metadata |
| 4 | Add Accountant and Warehouse | Accountant + warehouse from vendor |
| 5 | Vendor to Assignee mapping | Assignee from vendor |
| 6 | Cost Center to Assignee mapping | Override assignee if cost center is set |
| 7 | Project Select | Project dropdown |
| 8 | Approvers | Approver routing |
| 9 | Initialize Products | Item dropdown for header |
| 10 | Header Product Select | Item-derived data |
| 11 | Item Product Dropdown Init | Per-row item dropdowns |
| 12 | Item Product Mapping | Per-row item data |
Reading top to bottom: each step establishes something a later step needs. Step 1's customerInitials is used by steps 4, 7+. Step 3's vendorAccount is used by steps 4, 9+. The cascade builds incrementally.
If you reordered this to put step 1 at the bottom, virtually every other step would silent-no-op for lack of customerInitials. Order is load-bearing.
What's next
- Triggers — what fires the workflow.
- The Initial_Workflow — the canonical multi-step workflow.
- Cascade rules — what doesn't happen (cross-workflow cascade).
- Cascade behavior — the conceptual treatment.