
Appearance
Splitting, combining and trimming documents
Use the page grid to separate invoices in one PDF, join uploads that belong together, or choose which pages need extraction. You can also keep supporting pages as attachments or remove unwanted pages.
Open the page grid
The same grid handles both files waiting for a decision and documents that have already been processed.
| What you want to do | Where to start |
|---|---|
| Change one document | Select its row in Documents and click Edit pages. |
| Work with several documents | Select their rows and click Combine pages. |
| Check a proposed split | Open the held file in Studio and click Review split. |
| Choose pages from a file held by the page threshold | Open it in Studio and click Select pages. |
In Studio, the scissors button also opens Edit pages for a processed document with several pages or pages left out of its scan. For a single-page document, use the list's Edit pages action.
Approved, validated, exported and still-processing documents cannot enter the page grid. Only PDFs can be cut or have their pages combined; image documents can be kept, attached whole or deleted whole.
Review a proposed split
A file marked Needs action is waiting for a decision. Click its badge in Studio to read the reason. A split may need review because the project always asks, a part has low or missing confidence, no proposed part has an accepted type, or the automatic cut could not be completed.
Click Review split to open the proposal. Each tile is a page, and dashed cut lines separate the proposed documents. Each part shows its page range and how it will be treated. Document parts also have Type and Name fields. Click a tile to inspect its larger preview.
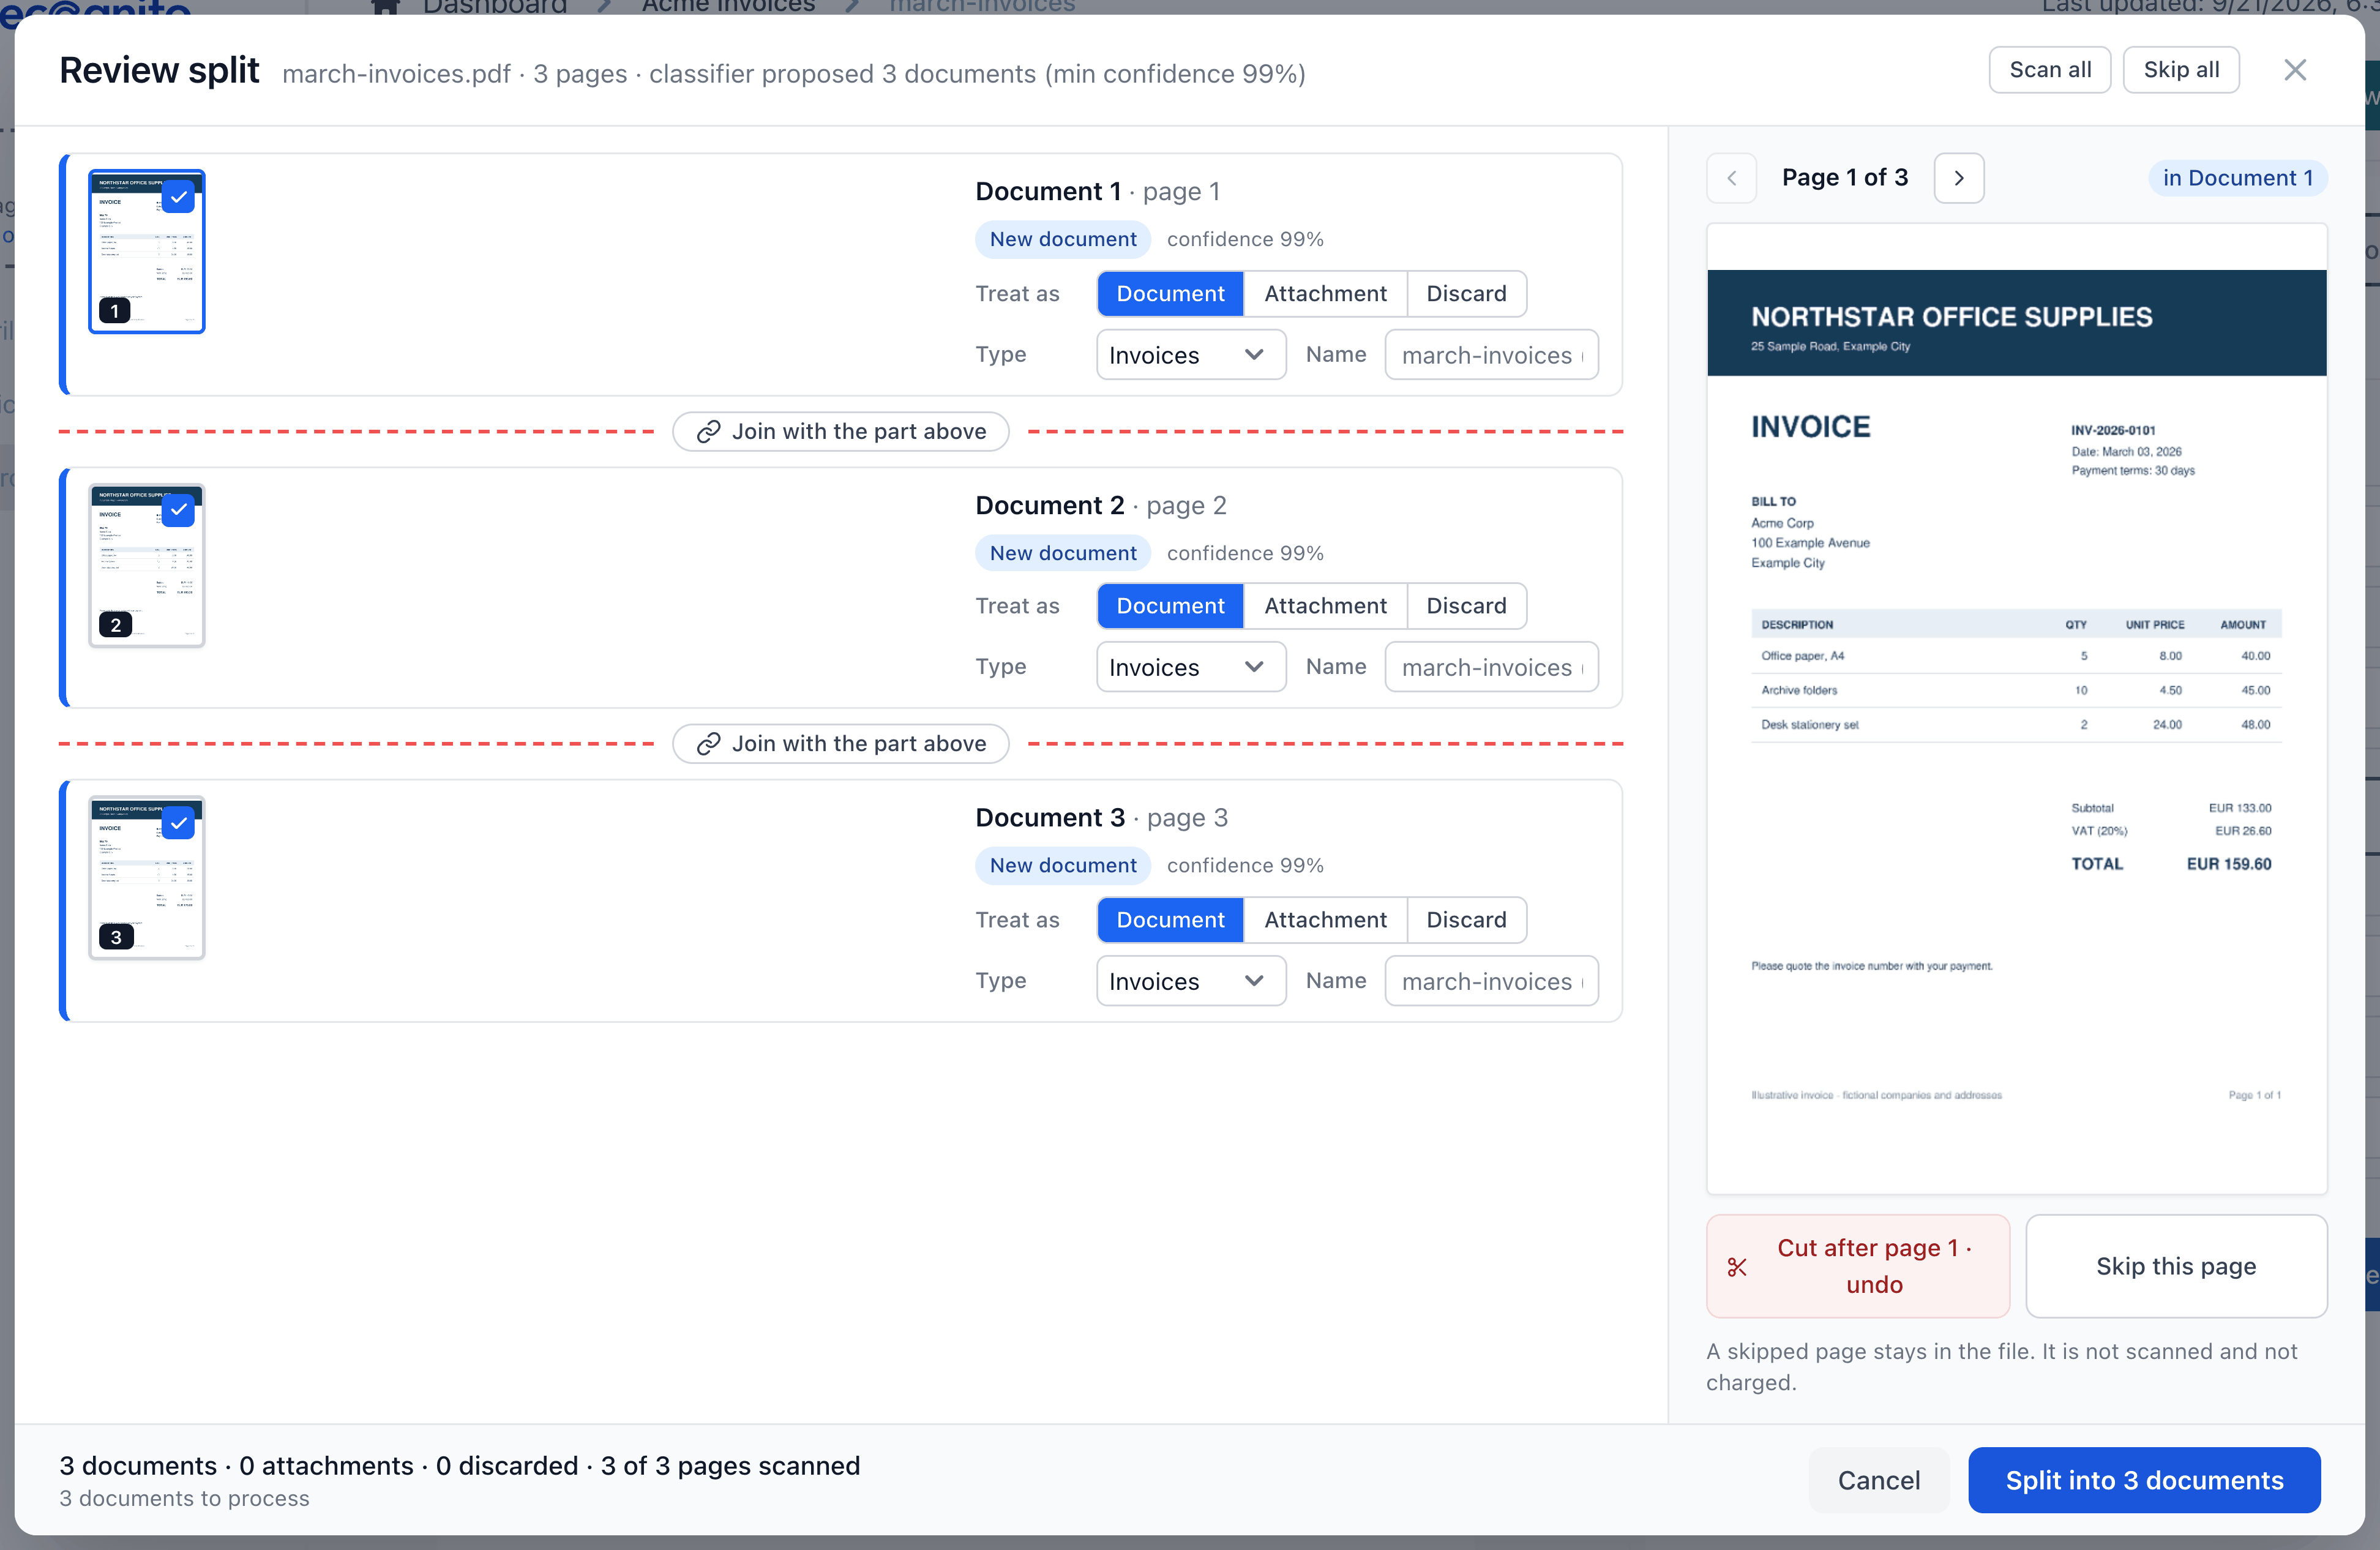
- Check where each document starts and ends. Keep all pages of a multi-page invoice together. To start a new document, click between two tiles or use Cut after page N in the preview. To remove a proposed cut, click Join with the part above.
- Check Treat as for each part. Document creates a document to process; Attachment keeps supporting pages with another document. The project's accepted types determine these initial choices, but you can change them.
- Check each document's Type and change it if needed. You can keep a part as a document even when its type is outside the project's accepted list.
- Enter a Name if you want to replace the suggested filename. Otherwise, split parts receive names derived from the original file.
- Read the footer's document, attachment and page counts, then confirm with the button naming the result, such as Split into 3 documents.
For example, the three one-page invoices shown above need a cut after page 1 and another after page 2. Each part stays a Document. If the last page were a delivery note supporting the second invoice, you could instead make that part an Attachment.
Keep at least one part as a document and at least one page selected for scanning in each document part. Fix the plan means the footer lists something you must correct before confirming. No changes means the plan still matches the original.
Split a PDF
You can make cuts yourself without requesting classification. Select the file in Documents and click Edit pages. It opens as an unchanged part.
Suppose pages 1–2 belong to one invoice and page 3 is another. Add a cut after page 2, leave both parts as Document, and check their types and names. The primary button becomes Split into 2 documents. Confirming creates separate documents from those page ranges.
To keep supporting pages, cut around them and choose Attachment under Treat as. An attachment goes to the nearest preceding document. If supporting pages come first, they attach to the first following document. The grid names the receiver so you can check the grouping before confirming.
Pages and parts retain their order. You cannot drag pages into a different position. For an already processed file, read what happens to existing values before applying a cut.
Combine documents or attach supporting files
Select two or more rows and click Combine pages. The documents appear in the list's current order, each as a separate part. Check that order before joining them.
Click Join with the part above at a boundary to combine neighbouring parts. Repeat for other boundaries you want to remove. To join all selected PDFs, remove the boundaries between them and confirm with Merge into 1 document. The combined document is scanned again.
If one file should accompany another without joining their pages, leave the boundary and choose Attachment under Treat as. A whole document attached this way is kept as it is and is not scanned again. This is useful for keeping a delivery note with an invoice while leaving the invoice's extracted values intact.
Attach files with Merge
The list's separate Merge action attaches whole files to one or more receiving documents. It does not join their pages or reprocess their values.
Select at least two rows and click Merge. Leave receiving documents in the Documents column and move supporting files to Attachments, either with Make attachment or by dragging them. Remove moves a file back before you confirm.
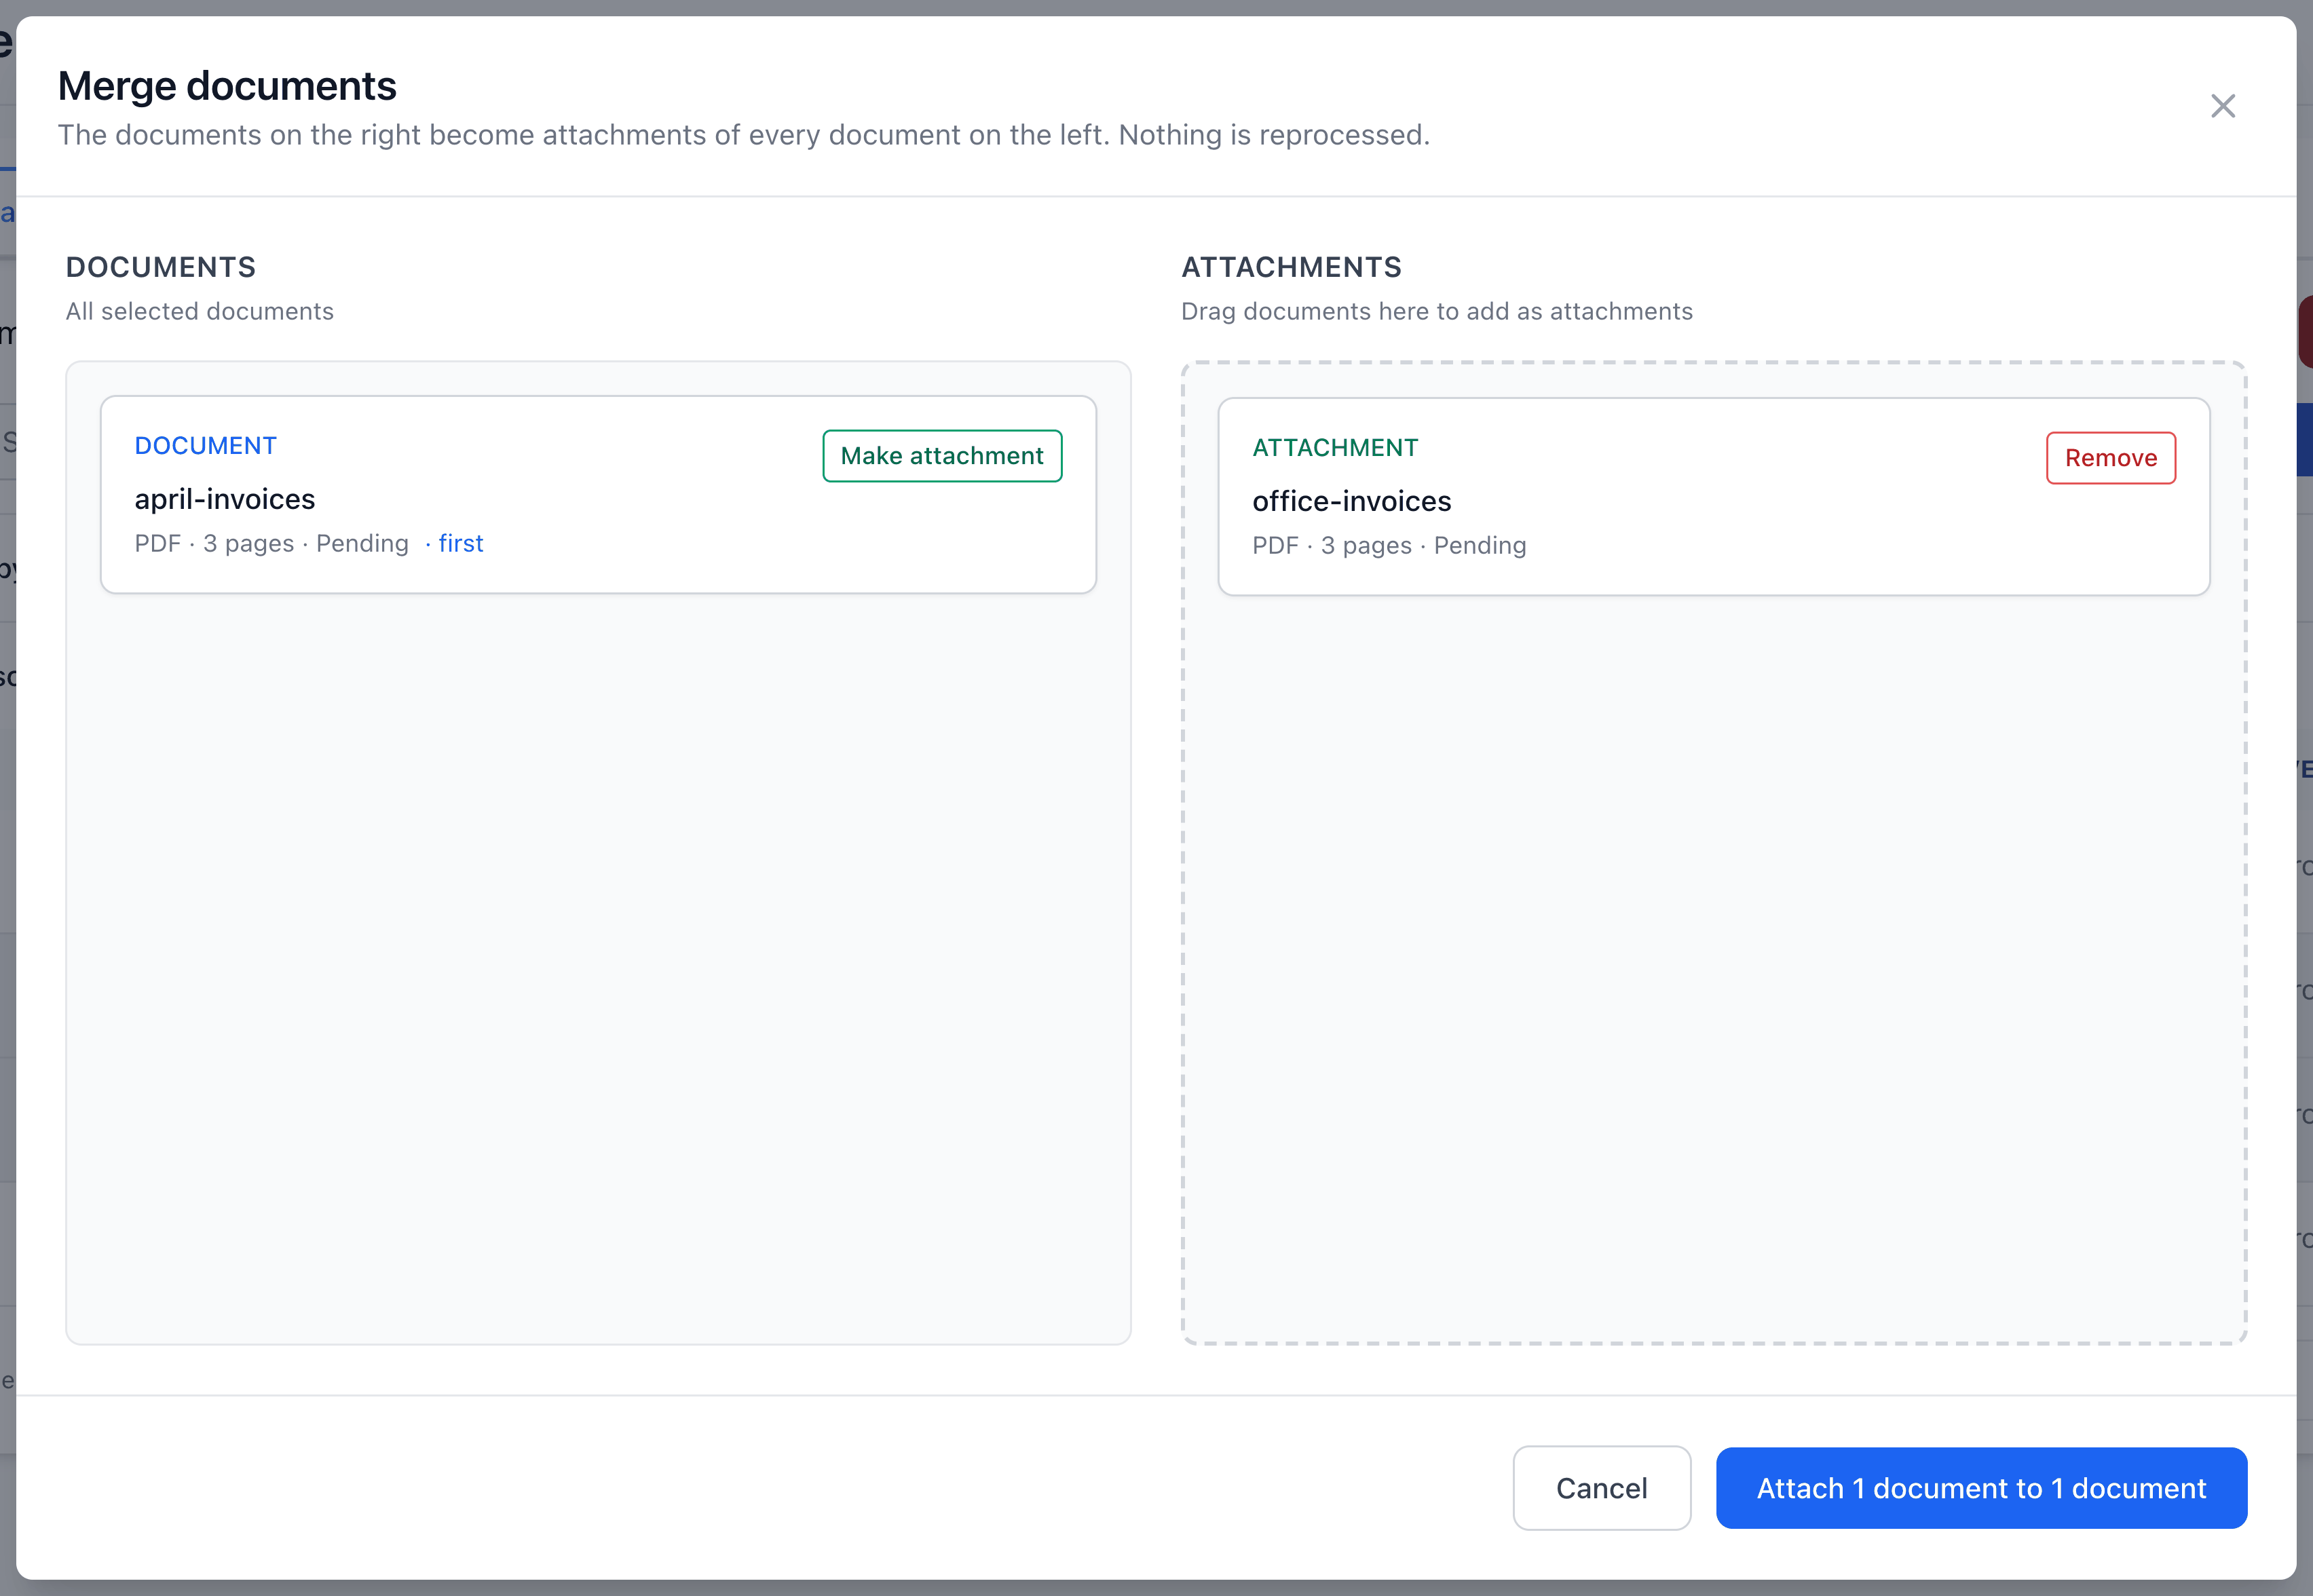
Each document on the left receives its own copy of every attachment on the right. For example, with two invoices on the left and one delivery note on the right, both invoices receive a copy of the note. Click Attach N documents to M documents to confirm.
The attached files disappear as standalone rows and appear in the receivers' Attachments panels in Studio. Their extracted values are not copied into the receivers. Approved and exported documents can receive attachments here, but cannot become attachments themselves; processing documents are locked.
Choose pages to scan or remove
If a file exceeds the project's Auto-scan page threshold, open it in Studio and click Select pages. In Select pages to scan, leave ticked only the pages you need extracted.
Untick a tile or use Skip this page in the preview. Tick it again or use Scan this page to include it. Keep at least one scanned page in every document part, then click the Process button showing your selection.
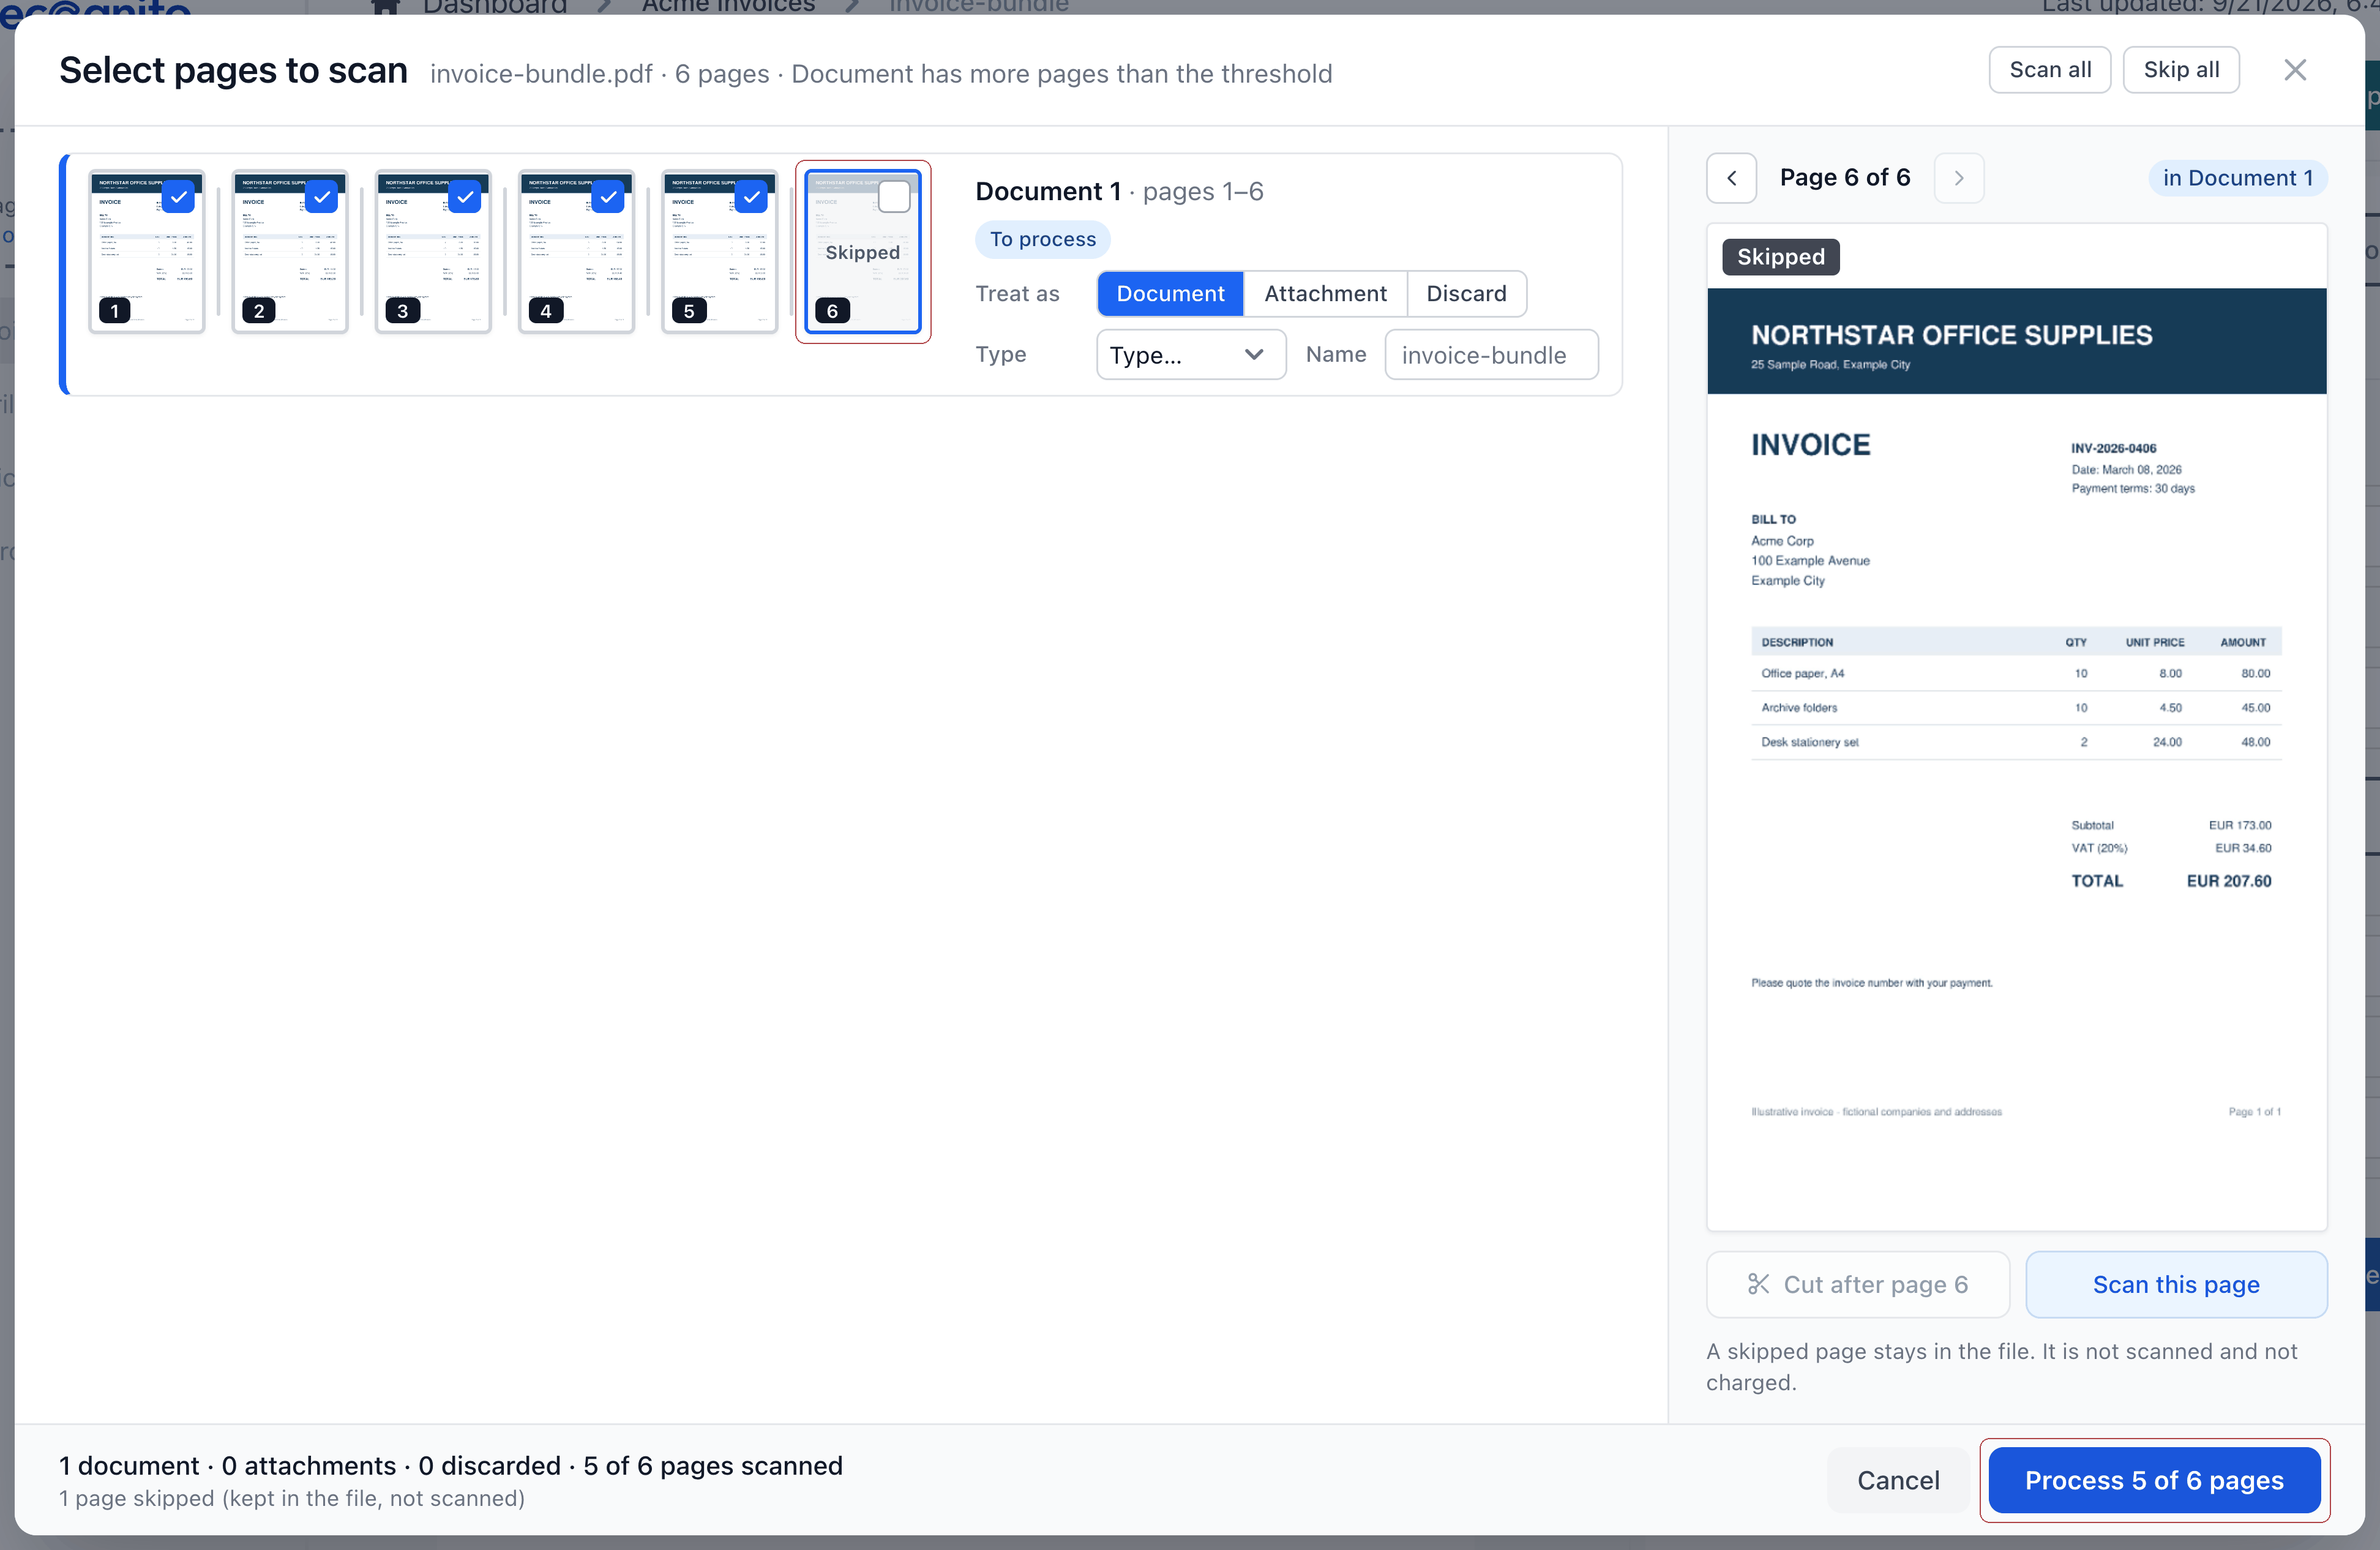
Skipping keeps a page in the file so you can still read it, but gives it no extracted values and no scanning charge. For example, skip a cover sheet you want to retain with the invoice. Studio shows N of M pages scanned afterward.
To remove pages from the resulting file, cut around them and choose Discard for that part. Delete removes a whole document and requires your existing document-delete permission. A separate confirmation states what will be removed; the deletion cannot be undone.
You can also split a held file while choosing pages. Documents you confirm in the grid are not held again by the page threshold. Automatically split documents can still exceed the threshold and need page selection.
Change a processed document
Use Edit pages to change an already processed document. The grid distinguishes changes that keep its current values from changes that require extraction again.
Existing values can be lost
Cutting or combining a processed document, or changing which pages are scanned, replaces both extracted values and your manual edits. The grid names the affected documents and adds values will be lost to the confirmation button.
Changing only Type or Name uses Save changes and keeps the values; changing a type alone does not re-extract the document. Attaching a whole document also avoids another scan. Changing the scan selection instead shows Scan again with N of M pages.
Before applying a mixed change, check the footer for all documents to process, attachments and deletions. Each document produced by a cut is scanned and charged as a new document. Attachments and skipped pages are not charged for scanning; see splitting costs.
Changes that process pages return you to the list with Working on the pages…. A split replaces the original list entry with the resulting documents, which go through extraction and the project's normal workflow. Type-only or name-only changes made in Studio save without leaving it.
If the result is slow to appear, check the list before submitting the same change again. Last change failed exposes the failure message. See page-change troubleshooting for waits and failures.
Review files held on upload
To have Recognito propose cuts, tick Classify and split multi-document files in Upload new files before adding your file. Without that checkbox, an app upload is neither classified nor automatically split. You can still use Edit pages afterward.
In Settings > General > Document splitting, choose how classified files are handled:
| Mode | What happens when several documents are detected |
|---|---|
| Off | Email intake stays whole. An app or API upload requesting classification still waits for split review. |
| Always ask me | A reviewer confirms the proposed parts before processing. |
| Automatic when confident | The file splits when every part meets the confidence threshold and at least one part has an accepted type. Otherwise, it waits for review. |
Splitting defaults to Off. In Automatic when confident, the threshold defaults to 90%; even one part below it, or without a score, holds the file for review. Detected parts with accepted types become documents; other parts become supporting attachments.
Email intake follows these modes only while Classify uploaded files is on. The separate Classify and split files uploaded from the app by default setting pre-ticks the upload checkbox. See General settings for configuration and API upload defaults.
For other Needs action reasons, Studio offers different controls. A page-threshold hold offers Select pages. A whole file with an unaccepted type offers a type selector and Process as instead. Read the badge's reason to choose the right action.
See also
- General settings: choose splitting behavior and accepted types for each project.
- Upload: file formats, upload limits and classification choices.
- Troubleshooting: resolve held files, unavailable actions and failed changes.